Getting Started: Global Address Books
I want to start by talking about the global address book today. And although we won't have enough time to go through all the details of the global address I'll have a couple more blogs on this particular topic that'll dive into specific pieces and parts. In this blog, I'm going to give you an overview, and we'll get started on some of the basic configurations. But before we jump into the software I have a diagram that you can find on the docs article called the global address book overview that will help you understand some of the basics and get used to some of the terminology that I'll be using when I talk about the global address book.
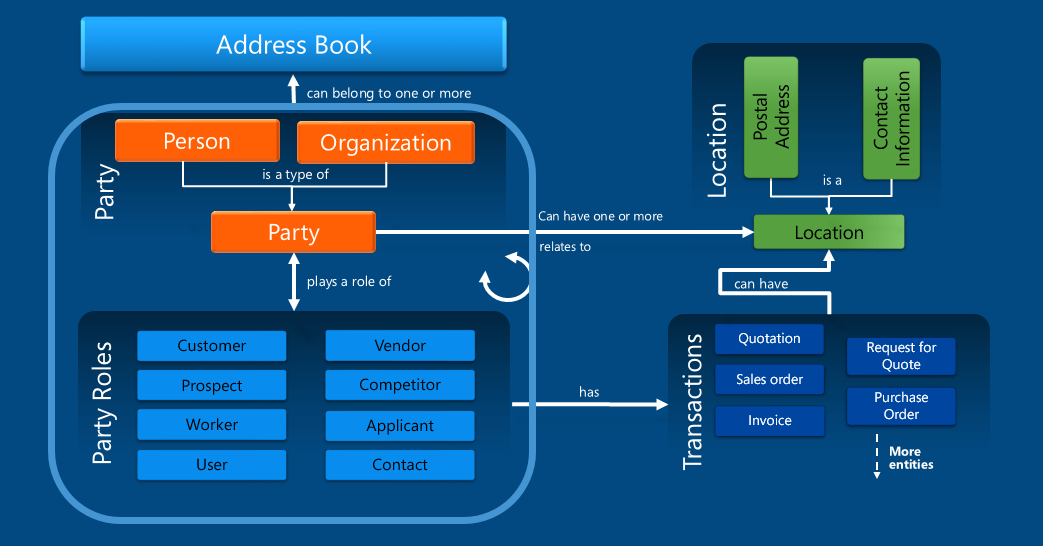
Dynamics 365 supports an unlimited number of address books but all of the addresses are stored in what we call the "global address book". An address book is simply just a collection of one or more "parties". So it's just like party central if you think of it that way. When we use the term party though we're not talking about having friends over to your house for a drink on Friday night. We're talking about either a person or an organization. So that address book is a collection of those people. If you think about how your grandmother used to maybe carry around an actual physical address book the global address book in Dynamics 365 is no different it's just not on a piece of paper in a little notebook by the telephone.
So when we take a look at this diagram you can see that there are a variety of different types of parties which are called "party roles" in Dynamics 365 and this isn't some sort of weird like role-playing type party. This is what type of person or organization is this particular entry in your address book. A particular party can have more than one role so examples of roles party roles are customers, vendors, prospects, competitors, workers, applicants, users, and contacts. But that's not the entire list of the different types of things that parties can be.
A party can also have one or more locations and a location can actually be where they are physically located, like a postal address, it can also include things like contact information. Contact information could be a variety of different things like a phone number, and email address, it could even include things like your LinkedIn URL or your Twitter handle, for example. These are all examples of locations in Dynamics 365.
When we put this all together and you see this bottom square on the right this is where we have transactions. Our party roles such as customers can have different types of transactions linked to them. Sales orders, for example, quotations, or invoices. If we're thinking about a vendor then we might have things like requests for quotes or purchase orders. This list that you see here is not an exhaustive list of all the different types of transactions that can relate to a party; but, when you create a new sales order as an example, you're going to select a customer and that customer is related to a party and that specific transaction can have a location. We actually decoupled the two because all of the data in the address book, like the address and contact information is date specific. Also, a sales order might use one address from a customer while an invoice might use a different type of address from a customer. That relationship is set up between the transaction and the individual parties and the locations that are part of that party record.
Now that we have a basic understanding of some of that terminology, what I want to do is switch on over to Dynamics 365 and take a look at the process for setting up an address book and reviewing the global address book parameters.
View the global address book
1. Open Organization administration > Global address book > Global address book.
2. Search or filter for a person or organization.
3. Click the link to open the details.
4. View address on the Addresses FastTab.
5. View contact information on the Contact information FastTab.
6. View relationships to other parties on the Relationships FastTab.
7. View roles that the party is associated with on the Roles FastTab.
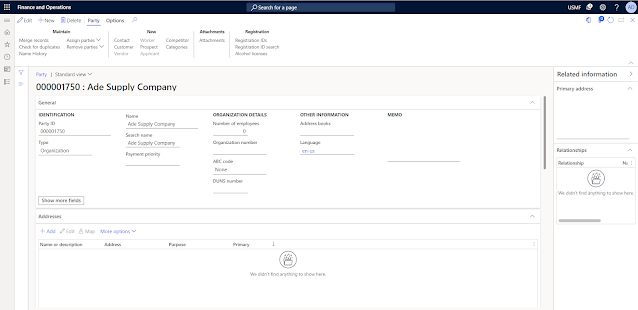
The Global address book page is an inquiry form where you can create new records. But typically you're not going to be creating address records or people or organizations directly from the Global address book page. Instead, you'll typically do it from the Customer form or the Vendor form, for example. The party records are created behind the scenes. The nice thing about this is that you can see the full list of all of the different contacts, different people, and different organizations. All of your warehouses are actually parties in here as well. You can see the full list of all of them in a single view, it can be searched, you can filter this list down, you can also look at what type of role they have. So if you just wanted to see the vendors or the contacts in your address book that have a vendor relationship you can filter that role down.
When you click on a particular record, it will open up the details of that global address book record. Now, this isn't your grandmother's address book. We have way more information and data that we can track and store against it. Your grandmother was probably just handwriting a name and address and maybe a phone number.
The relationships tab will show you anywhere that we have a relationship between parties. For example, if you're using the human resources functionality in Dynamics 365, you could set up a worker who has multiple beneficiaries or dependents. It is possible for a single-party record to have multiple roles associated with it. You'll also notice up at the top that there are buttons where I can create new records that are related to this party, and we can also update and control the registration IDs, do searches against those registration IDs, and so on.
Once you've configured all of the details of your global address book this is where all of the records get created and mastered to store the information about a person or organization.
Create an address book
1. Open Organization administration > Global address book > Address book.
2. Click New to create a new address book.
3. Enter a unique Name for the address book.
4. Enter a detailed Description for the address book.
5. Optionally, select Teams to link to the global address book.
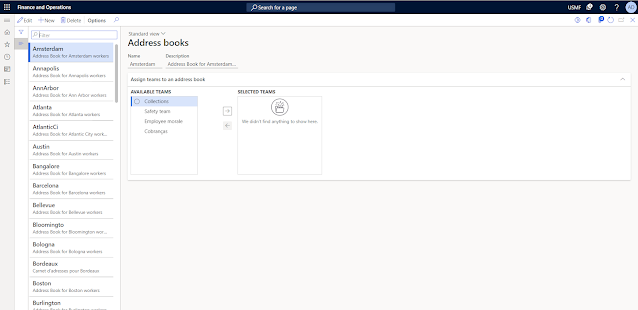
These address books are used in a variety of ways to group records that can be used for the commerce functionality in deciding which customers to synchronize to a retail point of sale, for example. It can also be used to control security around groups of users in different regions, and who has rights to see what in your human resources module as another example. There's no limit to how many address books you create.
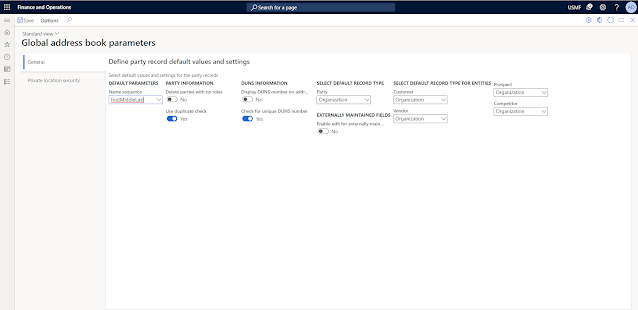
Configure Global address book parameters
- Open Organization administration > Global address book > Global address book parameters.
- Select a Name sequence to determine how names will be stored and displayed in the user interface.
- Optionally, select Delete parties with no roles to automatically delete a party record when there is no role related.
- Optionally, select Use duplicate check to check for a duplicate party record when you create new party records.
- Optionally, select Display DUNS number on addresses to display the DUNS number field when you are creating addresses. This allows each address to have a different DUNS number.
- Optionally, select Check for unique DUNS number to automatically check for duplicate DUNS numbers across parties and addresses.
- Select an option for Person or Organization to default when creating each of the following
- Party
- Customer
- Vendor
- Prospect
- Competitor
- Click the Private location security tab.
- Use the arrows to select Security roles that are allowed to view addresses where the Private check box is selected.
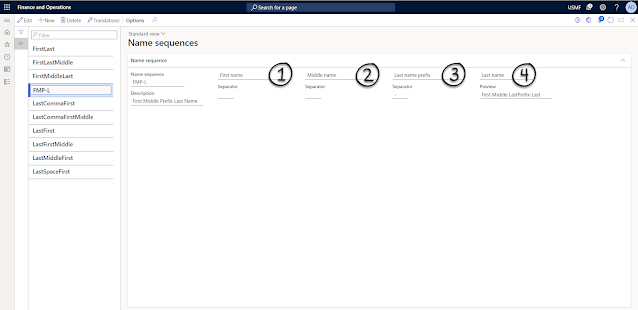
Create or view Name sequences
- Open Organization administration > Global address book > Name sequences.
- Click New to create a new name sequence.
- Enter a unique name in the Name sequence field.
- Enter a brief Description.
- In the fields (without labels) select the name component to appear first, second, third, and fourth (in sequence from top to bottom and then left to right).
- Between each name component field, optionally type a Separator such as a comma or a space.


Comments
Post a Comment